Django 博客项目中遇到的 bug
1. 配置路由:include
1 | urlpatterns = [ |
错误写法:path('userprofile/', include('userprofile.urls'), namespace='userprofile'),,_path() 中多了个参数,namespace 应该在 include 中。
报错:
1 | File "D:\django_learning\blog_project\blog_project\urls.py", line 22, in <module> |
2. forms 表单类字段 fields
1 | from django import forms |
Django项目中某 app 的 forms.py 段代码如上,执行时报错如下:
1 | File "D:\django_learning\blog_project\userprofile\urls.py", line 8, in <module> |
在 stackoverflow 上找到有类似的报错,排在前面的几个解决方法:
1 | class ArticleForm(forms.ModelForm): |
意思是 需要将 fields 的字段改为 __all__,或者在你的 form 中想去 include 的字段,这里我就是想要 username 和 email 。
或者:使用 exclude = ()
1 | class ArticleForm(forms.ModelForm): |
我尝试了两种,只有后面这种可以解决,第一种使用 __all__ 依旧报错,什么原因呢?不明白,最后才发现我写的 field 是单数,应该是 fields ,好吧,知道了。
3. 拓展 User 后,不删除原有数据登录会失败
1 | from django.db import models |
每个Profile模型对应唯一的一个User模型,形成了对User的外接扩展,因此你可以在Profile添加任何想要的字段。这种方法的好处是不需要对User进行任何改动,从而拥有完全自定义的数据表。
迁移好数据后,如果试图登录用户,会得到报错。这是因为之前创建的User数据都没有对应的Profile模型,违背了现有的模型。一种解决办法就是干脆删除旧的数据,因此就需要用到Django的shell命令。
输入下面两行指令就可以轻松删除User数据库:
1 | (env) D:\django_learning\blog_project>python manage.py shell |
因为前面写的article模型中,与User的外键也采用了models.CASCADE级联删除模式,因此随着User的删除,相关的文章也一并删除了。
输入exit()退出shell,输入指令python manage.py createsuperuser,重新创建管理员账户。
4. Profile.objects.get(user_id=id).exists() 出错
报错提示:{AttributeError}’Profile’ object has no attribute ‘exists’,’Profile’ object 只有我写的一些特殊具体的属性,没有exists属性或方法。
通过 dir(Profile.objects.filter(user_id=id)),可以证明通过 filter 可以产生 exists 属性。
5. 被包含的子路由模块需要添加app_name属性
1 | # blog_project/urls.py |
1 | File "D:\django_learning\blog_project\blog_project\urls.py", line 26, in <module> |
在新增 comment 评论的模型时,通过 python manage.py startapp comment新建一个评论的app,然后在 setting 中的 INSTALLED_APPS 列表添加 ‘comment’,在主路由中配置子路由,接着编写 comment 的模型类,写完后需要迁移数据库,执行 python manage.py makemigrations, 这时候出现上面这个报错。
报错信息是指,在 include() 中没有提供给一个支持的 app_name,需要在被包含的子模块(这里是 comment 目录下的 urls.py 模块)中设置 app_name 属性。
具体原因是在 comment 的 urls.py 文件中没有写该 app_name = ‘comment’, 以及配置 urlpatterns。
1 | # comment/urls.py |
再次执行迁移:
1 | (env) D:\django_learning\blog_project>python manage.py makemigrations |
6. 使用F12检查没有展示的元素
模板中已经写好前端的展示,视图函数也给前端传参了,但是实际就是没有显示。
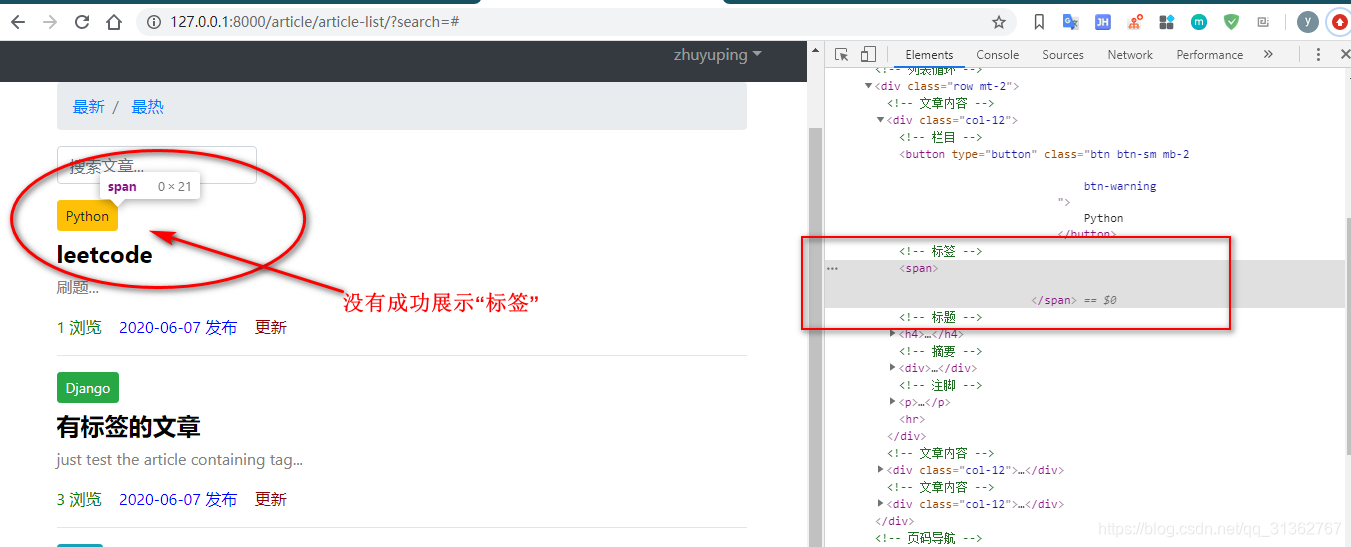
通过F12查看元素,可以发现该标签中没有内容,应该是没有从视图中获取到标签、或者获取到后经过前端操作后没有拿到该有的标签。
自然地,先检查视图函数有没有给前端模板传递对象,然后回到该页面的 html 代码中检查,发现是 html 中的变量 articles 写错了。
1 | {% for article in articles %} |
7. A server error occurred. Please contact the administrator.
修改 django 文件:D:\env\Lib\site-packages\django\views\debug.py,在打开文件时使用 utf-8,这样修改后,可以在页面看到具体的报错,而不只是一串“A server error occurred. Please contact the administrator.”。
1 | def get_traceback_html(self): |
no such column 报错:删库解决。。。重新生成迁移文件、创建数据。
8. 部署
以前还买了阿里云服务器,后来就没有续费了。现在在本地的 Ubuntu 上部署测试。
修改 Django 的配置文件
1
2
3
4
5
6
7
8
9
10# my_blog/settings.py
# 关闭调试模式
DEBUG = False
# 允许的服务器
ALLOWED_HOSTS = ['*']
# 静态文件收集目录
STATIC_ROOT = os.path.join(BASE_DIR, 'collected_static')虚拟环境一般是需要在服务器上重新生成的
安装包:
1
2
3
4
5
6
7sudo apt-get update
sudo apt-get upgrade
sudo apt-get install python3
sudo apt-get install python3-pip
sudo apt-get install git
sudo pip3 install virtualenv从远程库中拉取项目代码:
1
git clone https://gitee.com/zypdominate/django_learning.git
cd 进入项目中,生成虚拟环境,并激活:
1
2virtualenv --python=python3.6 env
source env/bin/activate安装库、收集静态资源、数据迁移了:
1
2
3pip3 install -r requirements.txt
python manage.py collectstatic
python3 manage.py migrate代码部署基本就完成了,接下来配置
Nginx安装 nginx:
1
sudo apt-get install nginx
启动 nginx,查看安装的 nginx 是否正常:
1
sudo service nginx start
打开浏览器,输入你的服务器公网 IP 地址(可在Ubuntu上试用)查看效果。
接着,重新写 Nginx 的配置文件。进入
/etc/nginx/sites-available目录,这里是定义 Nginx 可用配置 的地方。输入指令sudo vi dusaiphoto.com创建配置文件,以下是已经配置好的:1
2
3
4
5
6
7
8
9
10
11
12
13
14
15
16
17
18
19
20
21zyp@zyp-virtual-machine:/etc/nginx/sites-available$ ls
default my_blog sites
zyp@zyp-virtual-machine:/etc/nginx/sites-available$ cat my_blog
server {
charset utf-8;
listen 80;
server_name 192.168.171.128; # 暂时是我本地的Ubuntu的ip地址
location /static {
root /home/zyp/sites/django_learning/blog_project/collected_static;
}
location /media {
root /home/zyp/sites/django_learning/blog_project/media;
}
location / {
proxy_set_header Host $host;
proxy_pass http://unix:/tmp/192.168.171.128.socket;
}
}写的只是 Nginx 的可用配置,所以还需要把这个配置文件链接到在用配置上去:
1
sudo ln -s /etc/nginx/sites-available/my_blog /etc/nginx/sites-enabled
1
2
3
4
5
6
7zyp@zyp-virtual-machine:/etc/nginx/sites-available$ ls
default my_blog sites
zyp@zyp-virtual-machine:/etc/nginx/sites-available$ sudo ln -s /etc/nginx/sites-available/my_blog /etc/nginx/sites-enabled
...
zyp@zyp-virtual-machine:/etc/nginx/sites-enabled$ ls
my_blog sites至此 Nginx 就配置好了,接下来搞定
Gunicorn:- 安装
Gunicorn - 重启
Nginx服务 - 启动
Gunicorn
先回到项目所在的目录,并且进入虚拟环境,然后输入:
1
2
3(myenv) zyp@zyp-virtual-machine:~/sites/django_learning/blog_project$ pip3 install gunicorn
(myenv) zyp@zyp-virtual-machine:~/sites/django_learning/blog_project$ sudo service nginx reload
(myenv) zyp@zyp-virtual-machine:~/sites/django_learning/blog_project$ gunicorn --bind unix:/tmp/192.168.171.128.socket blog_project.wsgi:application也可以用
sudo service nginx restart,区别是 reload 只重载配置文件,restart 重启整个服务。最后打开浏览器,访问服务器查看效果。
- 安装
9. css、js等没有加载出来
本地调试好工程后,服务起来后在浏览器上测试也是正常的,但是一部署后就发现浏览器中没有加载css、js等,只有单纯的html格式,经过查看 nginx 的日志发现了问题:没有所需要的文件。
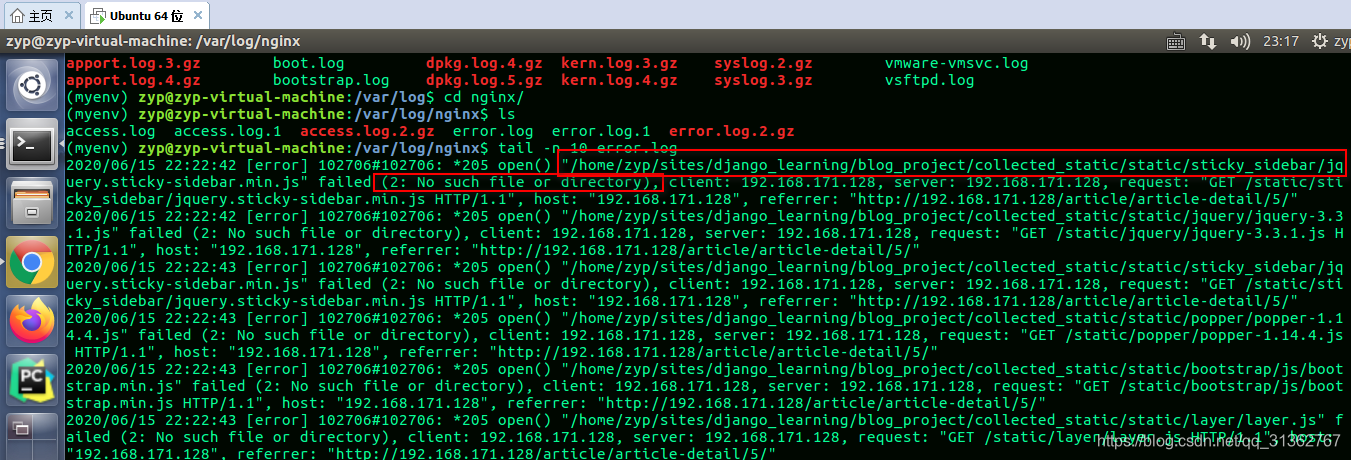
怎么会没有该文件呢?于是查看了 nginx 的配置文件:
1 | server { |
然后查看工程中 collected_static 目录下,发现没有 static 目录,所需要的 css、js文件都直接在 collected_static 目录下,也就是少了中间件一层 static。可以推理是在执行 python manage.py collectstatic 后出现的问题,排查发现在 settings.py 文件中的静态文件收集目录的路径有误:
1 | # 静态文件收集目录 |
添加 static 后就可以展示 css、js等了:
1 | # 静态文件收集目录 |
同理,media 目录中存放的资源在页面中加载不出来,也是路径的问题。其实这边可以修改工程中的 settings.py 文件,也可以更改 nginx 中的配置文件。
最后,终于改好了:
